Managing orders, payments, and analytics without a reliable POS can be overwhelming. We get it. That’s why MENU TIGER just got even better.
With the new Loyverse integrations, your trusted interactive restaurant menu seamlessly connects with a powerful POS system, simplifying order management, payments, and sales tracking in one place.
No more juggling multiple tools. Just effortless operations, happier customers, and a restaurant that runs like clockwork.
Table of Contents
ToggleWhat is Loyverse integration?
Loyverse integration refers to connecting Loyverse’s point of sale (POS) with other software or systems to streamline business operations.
Loyverse is one of the trusted POS systems for restaurants, hospitality industry, and retailers.
Its user-friendly interface provides sales analytics, inventory management, employee management, and customer databases.
Even better, it also offers a mobile app version of its software, making it much easier to manage a QR code menu and view restaurant data without carrying around your laptop or constantly checking the computer.
Through the Loyverse API, a QR code menu software like MENU TIGER can integrate features smoothly and automatically upgrade its functionality, similar to how platforms utilize the Depositphotos API for enhanced content integration.
So, whenever your customers place an order through a menu QR code displayed on your restaurant table, it will be recorded on MENU TIGER and Loyverse’s database for a more extensive sales report.
This means that invoices, customer information, and sales reports are generated on both pieces of software and are readily accessible on MENU TIGER.
It’s a total cost-saving experience. You no longer need to pay for a separate POS service using a QR code in the menu.
All of Loyverse’s features are efficiently incorporated into MENU TIGER, so you don’t have to switch between software while running your restaurant.

Loyverse vs other POS integrations
Choosing the right POS system can make or break your business operations. Whether you’re running a restaurant, retail store, or service-based business, you need a POS that integrates seamlessly with your workflow.
One option worth considering is the Loyverse point of sale, a free POS solution popular among small businesses. But how does it stack up against other POS integrations? Here’s a breakdown:
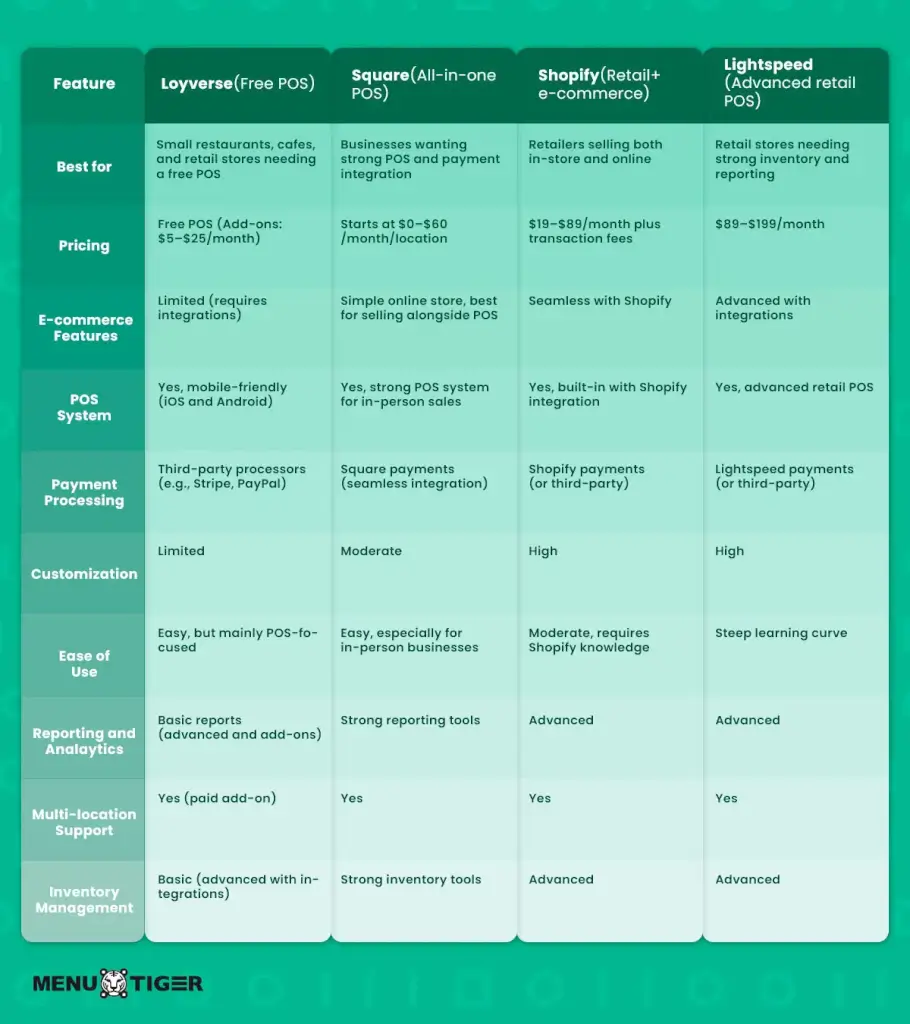
So, which POS is best for your business? The answer depends on the type of business you operate.
- Choose Loyverse if you need a free, simple POS for small businesses.
- Go with Square if you want an all-in-one POS with built-in payments.
- Pick Shopify POS if you’re a retailer selling both online and in-store.
- Try Lightspeed if you need advanced inventory and multi-location support.
- Go with WooCommerce if you prefer a fully customizable WordPress store.
- Choose Wix POS if you want a simple website + POS solution.
Part I: How to activate Loyverse POS system on MENU TIGER’s QR code menu software
Step 1: Log in to your MENU TIGER account
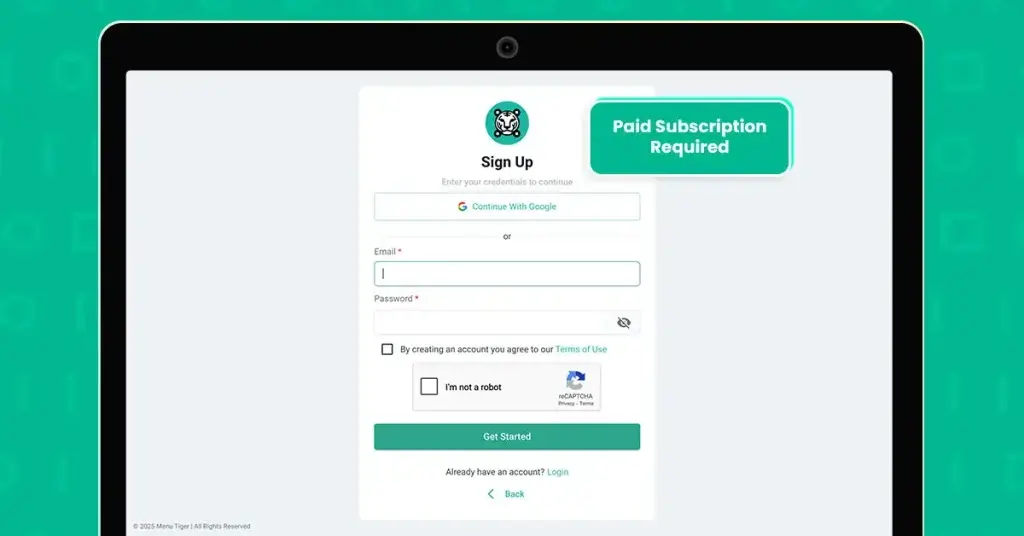
Note: To use this integration, you need a paid subscription plan on MENU TIGER. You can choose from the pricing tiers: Regular, Advanced, and Premium.
Step 2: Click the “Integrations” tab on the left panel and tap “POS.”
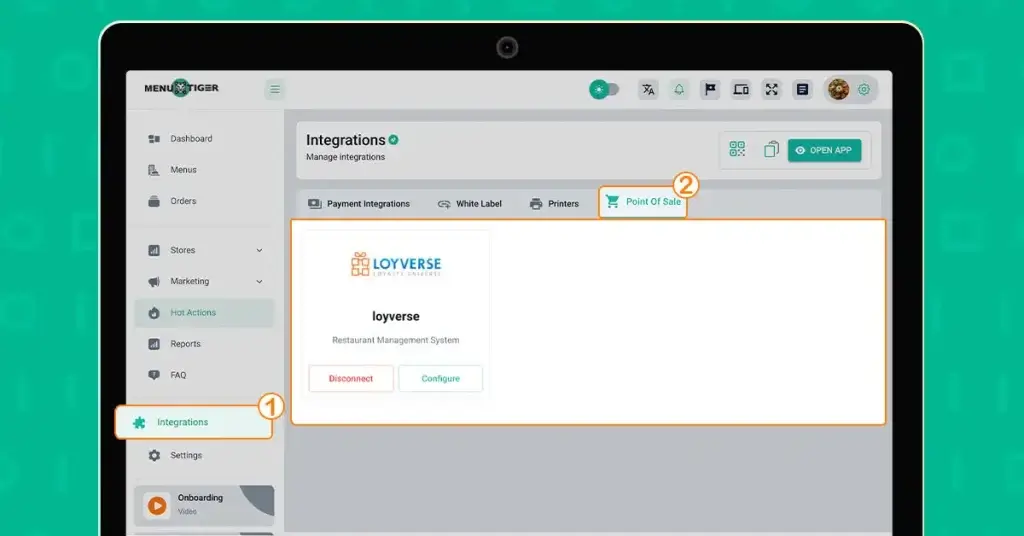
Step 3: Sign up or log in to your Loyverse account and follow the prompts.
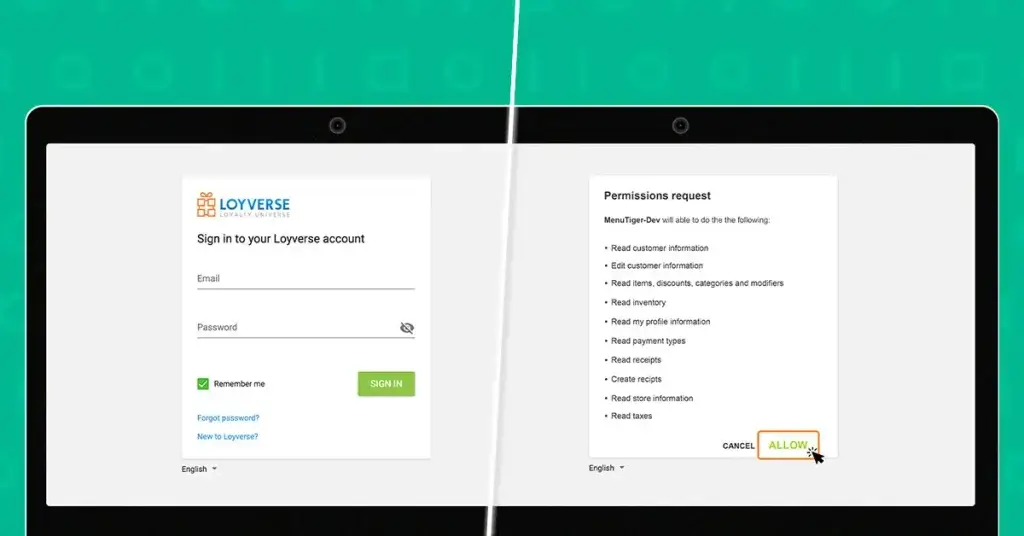
If you’re new to this Loyverse POS login procedure, tap on the New to Loyverse? option to create your own account.
A permission request page will pop up on the screen. Click Allow to Loyverse permission page.
You’re now ready to set up the menu you will use for your customers.
Part II: How to sync your MENU TIGER menu with Loyverse POS
MENU TIGER users can create and customize their food and drink menu directly from the software. But any orders made using this menu will not be recorded in the Loyverse system right out of the box.
First, you’ll need to synchronize the MENU TIGER menu with Loyverse POS. Here’s how to do it:
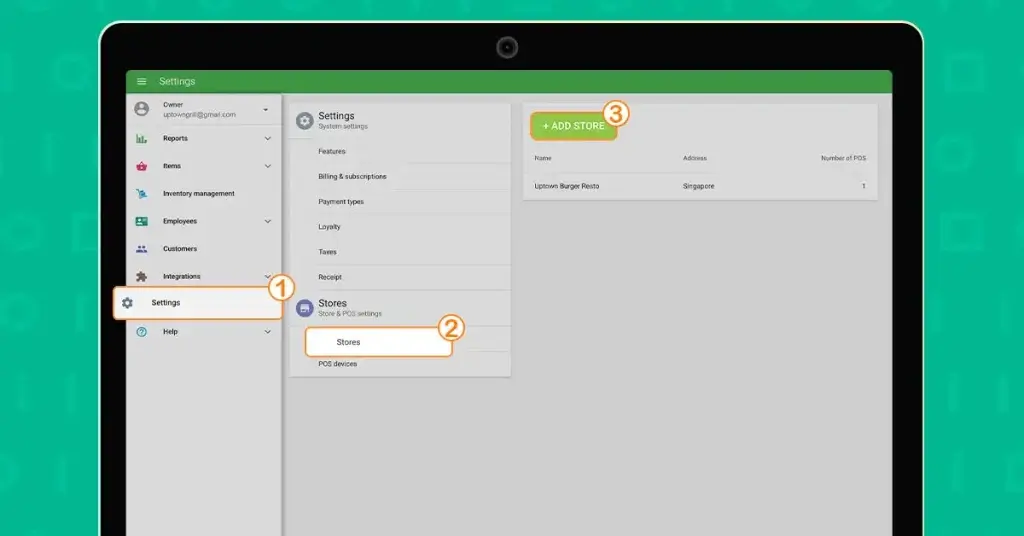
Step 1: Go to the Loyverse back office to set up your stores.
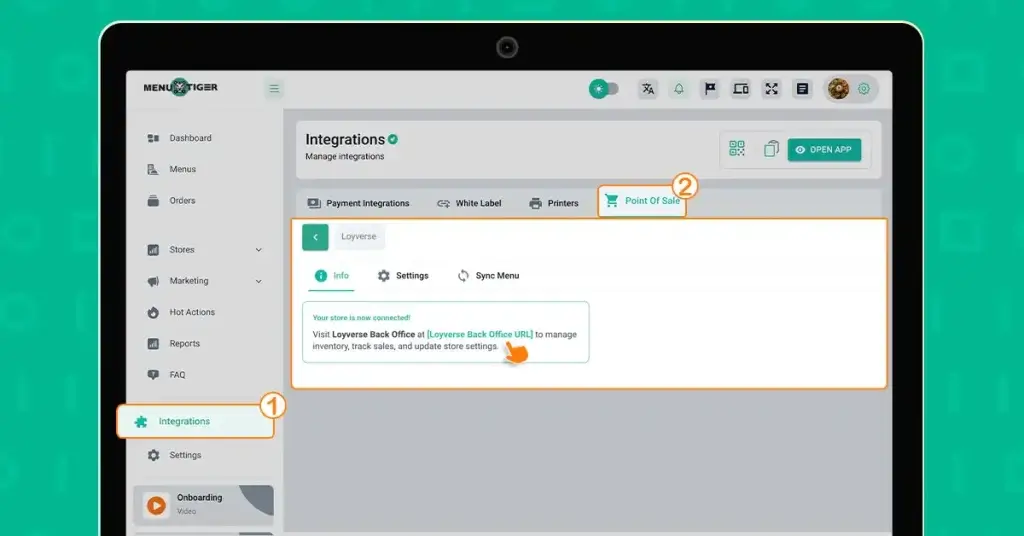
Step 2: Add stores to your Loyverse dashboard.
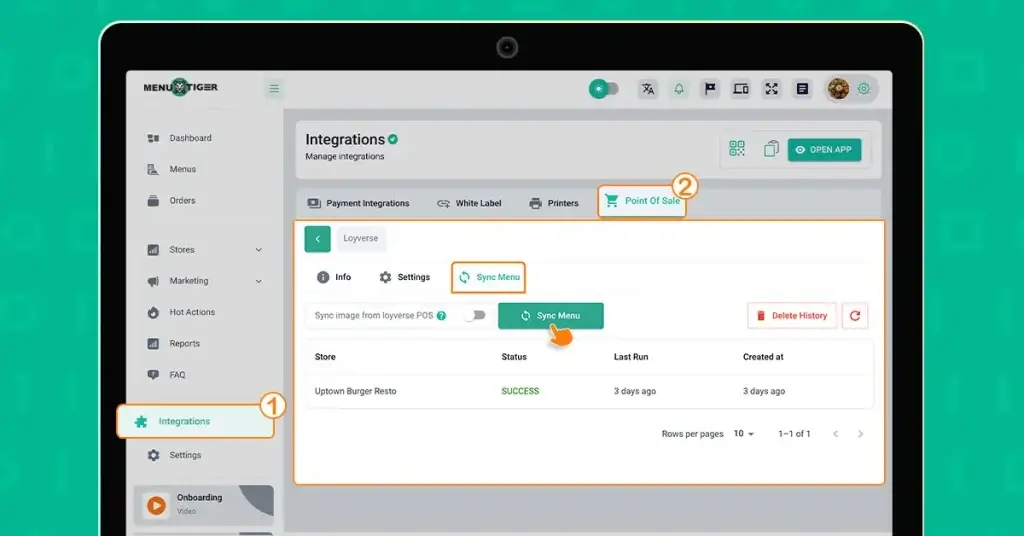
Step 3: Go back to your MENU TIGER admin panel to sync your menu.
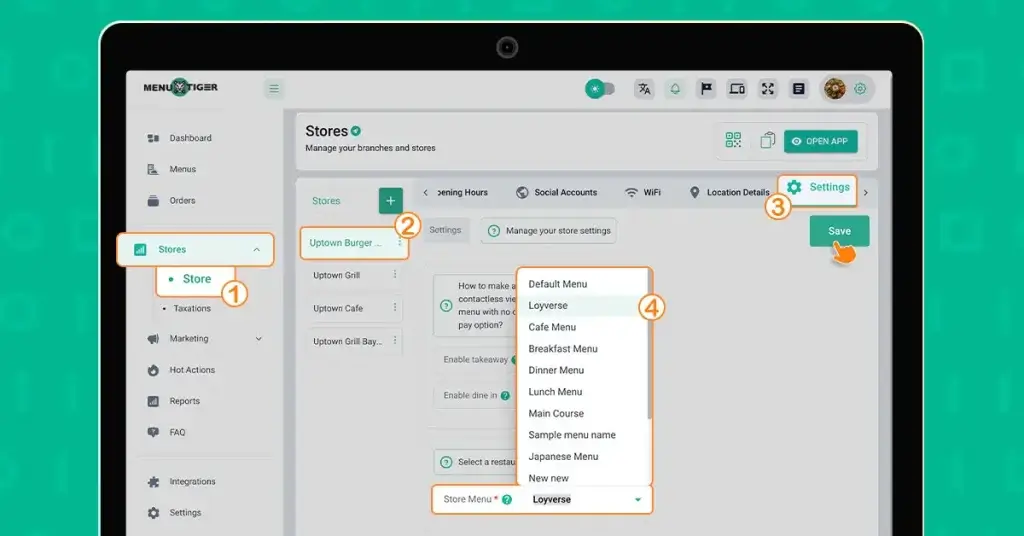
Step 4: Activate the Loyverse menu on a specific store.
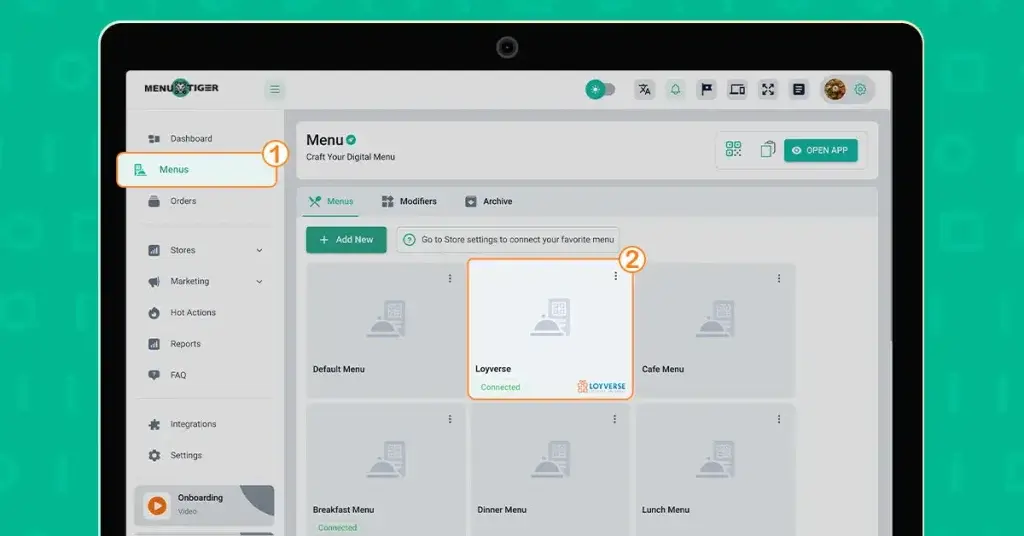
Step 5: Verify if menu changes are successful.
Advantages of using MENU TIGER’s Loyverse POS integration
Enhanced efficiency
Even a small delay can throw everything off in a busy restaurant. That’s why MENU TIGER’s restaurant ordering software integrates seamlessly with Loyverse POS, eliminating manual order entry and ensuring smooth service.
Orders sync in real-time, ensuring the kitchen gets accurate, up-to-the-minute details. There are no mix-ups and no wasted time.
The way orders update automatically is comparable to a Continuous Integration test in software, ensuring seamless communication across systems
This means that if your customer customizes their Eggs Benedict, for example, and the kitchen sees the update instantly, making sure the dish is prepared exactly as requested. No back-and-forth, just flawless execution.
Comprehensive sales and customer insights
Understanding customer behavior is key to maximizing your profits. MENU TIGER and Loyverse provide detailed restaurant analytics, helping you track top-selling items, peak hours, and customer preferences.
These insights enable smarter menu decisions and targeted promotions.
So if your avocado toast sales spike on weekends, you can highlight it on the menu or introduce a variation to boost revenue.
Seamless and secure payment processing
Speed and accuracy matter at checkout. Once a customer orders via MENU TIGER, Loyverse POS handles payment efficiently, reducing delays and securing precise transaction records.
Your guests can pay directly from their phone, skipping the wait for the bill and improving table turnover.
Real-time Loyverse inventory management
Nothing frustrates a customer more than ordering an item already sold out.
With Loyverse’s real-time restaurant inventory system updates, you can prevent overselling and enhance stock management.
For instance, when the last portion of smoked salmon is served, the Loyverse system automatically deducts the used ingredients from the inventory. This ensures your customers only see what’s truly in stock.
Improved customer experience and retention
Fast, accurate service keeps customers coming back. With MENU TIGER and Loyverse POS, guests can place orders and pay seamlessly through their phones, reducing wait times.
Real-time order syncing ensures accuracy, preventing frustrating mistakes like a kitchen missing a guest’s special request.
Plus, the integrated loyalty programs make it easy for customers to earn and redeem rewards, encouraging repeat visits.
A regular who always orders a smoked salmon bagel, for example, can automatically receive a personalized discount, strengthening their connection to your restaurant.

Upgrade your restaurant with MENU TIGER + Loyverse today
Running a restaurant is tough. So why make it harder?
With MENU TIGER’s Loyverse integration, you will get instant access to sales insights, real-time order syncing, and smooth payment processing—all without extra hassle.
Activate it in just a few clicks and start optimizing your operations today. Log in to your MENU TIGER account now and see how effortless restaurant management can be!
FAQs
Loyverse, a point-of-sale (POS) and inventory management software does not directly integrate with Square, another popular POS system.
Here’s how you can add payment type to Loyverse POS:
1. Login to the Loyverse Back Office website.
2. Go to the left-hand side menu and locate the Settings icon.
3. Under Settings, click the Payment type option. The payment configuration form or page will appear on the screen.
4. Tap the Add payment type to customize. You can then choose options such as Cash, Card, Check, and Others by clicking the check box before each item.
5. Save the changes made, refresh your Loyverse dashboard, and the updated payment type will reflect on the screen.
There is no additional cost needed. The Loyverse POS integration is included in MENU TIGER’s Regular ($17), Advanced ($46), and Premium ($119) plans.
No, you can’t. The Loyverse integration works as a default menu for a single store or restaurant location of your choice.
Check your internet connection, restart the app, and ensure all devices are updated. If the issue persists, sync manually from the settings or reinstall the app.
Verify your credentials, reset your password if needed, and check for app updates. Clear cache or reinstall if issues persist.
Loyverse doesn’t natively integrate with Squarespace or WordPress, but you can connect them using third-party tools like Zapier integration for restaurants or API integrations.
Wix integration with Loyvers POS is typically handled through third-party automation platforms like Zapier, SKUPlugs, and Appy Pie to connect the two systems via APIs.

